- 浏览: 1894178 次
- 性别:

- 来自: 北京
-

文章分类
最新评论
-
龙宝宝吱吱:
我现在知道是在部署的项目里找,可是找不到啊,一般这个文件会在什 ...
webservice浏览器远程调用测试 -
龙宝宝吱吱:
这个webconfig文件在哪里啊,大神
webservice浏览器远程调用测试 -
yuer1218:
正在学习这块,能把源码发我一份吗,12045464@qq.co ...
Android时钟的widget【安卓进化三十七】 -
hongshanguo:
为嘛没有任务管理器的,求案例啊
近百android程序源码贡献 -
难得糊涂CN2010:
最近一个项目要用到widget,可以送下源码不?dz.bita ...
Android时钟的widget【安卓进化三十七】
AndroidICS4.0---->LockScreen锁屏流程【Android源码解析九】
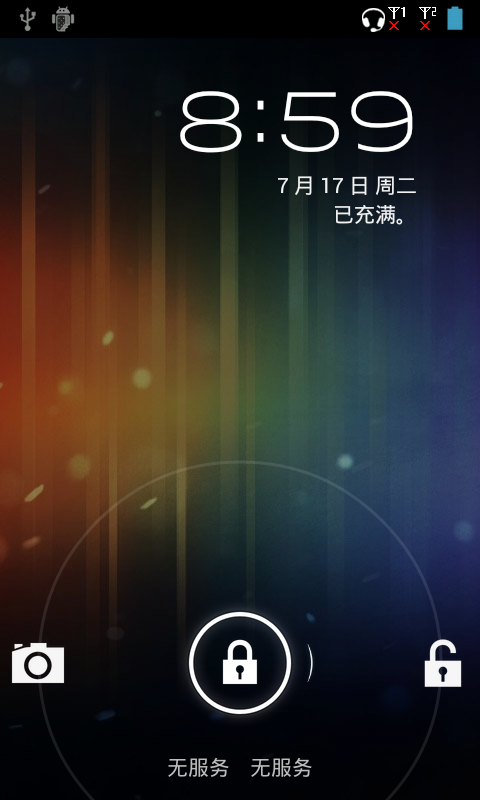
先来说说LockScreen分类;
一、无锁屏;
二、锁屏:
1、UnLockScreen:
图案锁、 PIN锁, 密码锁;
2、LockScreen:
波纹锁;
转载请表明出处:http://blog.csdn.net/wdaming1986/article/details/7753206
有图有真相------>
接着我们来看看LockScreen的时序图:
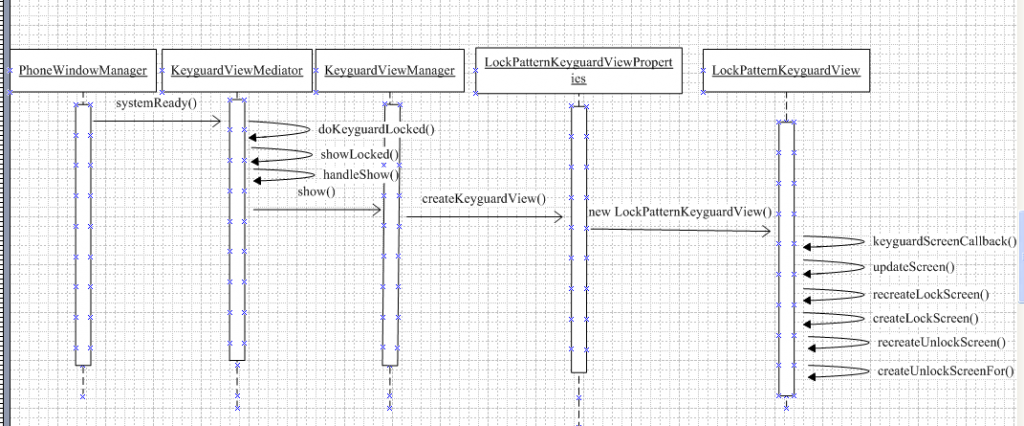
综上所述:
1、createUnlockScreenFor()方法创建的是UnLockScreen界面,代码如下:
 View createUnlockScreenFor(UnlockMode unlockMode) {
        View unlockView = null;

        if (DEBUG) Log.d(TAG,
                "createUnlockScreenFor(" + unlockMode + "): mEnableFallback=" + mEnableFallback);

        if (unlockMode == UnlockMode.Pattern) {
            PatternUnlockScreen view = new PatternUnlockScreen(
                    mContext,
                    mConfiguration,
                    mLockPatternUtils,
                    mUpdateMonitor,
                    mKeyguardScreenCallback,
                    mUpdateMonitor.getFailedAttempts());
            view.setEnableFallback(mEnableFallback);
            unlockView = view;
        } else if (unlockMode == UnlockMode.SimPuk) {
            unlockView = new SimPukUnlockScreen(
                    mContext,
                    mConfiguration,
                    mUpdateMonitor,
                    mKeyguardScreenCallback,
                    mLockPatternUtils, MSimTelephonyManager.getDefault().getDefaultSubscription());
        } else if (unlockMode == UnlockMode.SimPin) {
            unlockView = new SimUnlockScreen(
                    mContext,
                    mConfiguration,
                    mUpdateMonitor,
                    mKeyguardScreenCallback,
                    mLockPatternUtils);
        } else if (unlockMode == UnlockMode.Account) {
            try {
                unlockView = new AccountUnlockScreen(
                        mContext,
                        mConfiguration,
                        mUpdateMonitor,
                        mKeyguardScreenCallback,
                        mLockPatternUtils);
            } catch (IllegalStateException e) {
                Log.i(TAG, "Couldn't instantiate AccountUnlockScreen"
                      + " (IAccountsService isn't available)");
                // TODO: Need a more general way to provide a
                // platform-specific fallback UI here.
                // For now, if we can't display the account login
                // unlock UI, just bring back the regular "Pattern" unlock mode.

                // (We do this by simply returning a regular UnlockScreen
                // here.  This means that the user will still see the
                // regular pattern unlock UI, regardless of the value of
                // mUnlockScreenMode or whether or not we're in the
                // "permanently locked" state.)
                return createUnlockScreenFor(UnlockMode.Pattern);
            }
        } else if (unlockMode == UnlockMode.Password) {
            unlockView = new PasswordUnlockScreen(
                    mContext,
                    mConfiguration,
                    mLockPatternUtils,
                    mUpdateMonitor,
                    mKeyguardScreenCallback);
        } else {
            throw new IllegalArgumentException("unknown unlock mode " + unlockMode);
        }
        initializeTransportControlView(unlockView);
        initializeFaceLockAreaView(unlockView); // Only shows view if FaceLock is enabled

        mUnlockScreenMode = unlockMode;
        return unlockView;
    }
2、createLockScreen()就是创建LockScreen界面:
View createLockScreen() {
    	/*View lockView = new LockScreen(
                mContext,
                mConfiguration,
                mLockPatternUtils,
                mUpdateMonitor,
                mKeyguardScreenCallback);
         initializeTransportControlView(lockView);
         return lockView;*/

    	long lockscreenType = 0;
    	try{
    		lockscreenType = android.provider.Settings.Secure.
    				getLong(mContext.getContentResolver(), "lockscreen.disabled");
    	}catch(Exception e){
    		e.printStackTrace();
    	}
    	View lockView = null;
         lockView = new LockScreen(
    				mContext,
    				mConfiguration,
    				mLockPatternUtils,
    				mUpdateMonitor,
    				mKeyguardScreenCallback);
         initializeTransportControlView(lockView);
        return lockView;
}
我们来看看锁屏界面的流程:
step 1:创建LockScreen.java类——>先看看构造函数:
 LockScreen(Context context, Configuration configuration, LockPatternUtils lockPatternUtils,
            KeyguardUpdateMonitor updateMonitor,
            KeyguardScreenCallback callback) {
        super(context);
        mLockPatternUtils = lockPatternUtils;
        mUpdateMonitor = updateMonitor;
        mCallback = callback;

        mEnableMenuKeyInLockScreen = shouldEnableMenuKey();

        mCreationOrientation = configuration.orientation;

        mKeyboardHidden = configuration.hardKeyboardHidden;

        if (LockPatternKeyguardView.DEBUG_CONFIGURATION) {
            Log.v(TAG, "***** CREATING LOCK SCREEN", new RuntimeException());
            Log.v(TAG, "Cur orient=" + mCreationOrientation
                    + " res orient=" + context.getResources().getConfiguration().orientation);
        }

        final LayoutInflater inflater = LayoutInflater.from(context);
        if (DBG) Log.v(TAG, "Creation orientation = " + mCreationOrientation);
        if (mCreationOrientation != Configuration.ORIENTATION_LANDSCAPE) {
            inflater.inflate(R.layout.keyguard_screen_tab_unlock, this, true);
        } else {
            inflater.inflate(R.layout.keyguard_screen_tab_unlock_land, this, true);
        }

        if (TelephonyManager.getDefault().isMultiSimEnabled()) {
            mStatusViewManager = new MSimKeyguardStatusViewManager(this, mUpdateMonitor,
                    mLockPatternUtils, mCallback, false);
        } else {
            mStatusViewManager = new KeyguardStatusViewManager(this, mUpdateMonitor,
                    mLockPatternUtils, mCallback, false);
        }

        setFocusable(true);
        setFocusableInTouchMode(true);
        setDescendantFocusability(ViewGroup.FOCUS_BLOCK_DESCENDANTS);

        mAudioManager = (AudioManager) mContext.getSystemService(Context.AUDIO_SERVICE);
        // modify by wangxianming in 2012-06-22
        if (mAudioManager != null) {
        	mSilentMode = isSilentMode();
        }

        mUnlockWidget = findViewById(R.id.unlock_widget);
        if (mUnlockWidget instanceof SlidingTab) {
            SlidingTab slidingTabView = (SlidingTab) mUnlockWidget;
            slidingTabView.setHoldAfterTrigger(true, false);
            slidingTabView.setLeftHintText(R.string.lockscreen_unlock_label);
            slidingTabView.setLeftTabResources(
                    R.drawable.ic_jog_dial_unlock,
                    R.drawable.jog_tab_target_green,
                    R.drawable.jog_tab_bar_left_unlock,
                    R.drawable.jog_tab_left_unlock);
            SlidingTabMethods slidingTabMethods = new SlidingTabMethods(slidingTabView);
            slidingTabView.setOnTriggerListener(slidingTabMethods);
            mUnlockWidgetMethods = slidingTabMethods;
        } else if (mUnlockWidget instanceof WaveView) {
            WaveView waveView = (WaveView) mUnlockWidget;
            WaveViewMethods waveViewMethods = new WaveViewMethods(waveView);
            waveView.setOnTriggerListener(waveViewMethods);
            mUnlockWidgetMethods = waveViewMethods;
        } else if (mUnlockWidget instanceof MultiWaveView) {
            MultiWaveView multiWaveView = (MultiWaveView) mUnlockWidget;
            MultiWaveViewMethods multiWaveViewMethods = new MultiWaveViewMethods(multiWaveView);
            multiWaveView.setOnTriggerListener(multiWaveViewMethods);
            mUnlockWidgetMethods = multiWaveViewMethods;
        } else {
            throw new IllegalStateException("Unrecognized unlock widget: " + mUnlockWidget);
        }

        // Update widget with initial ring state
        mUnlockWidgetMethods.updateResources();

        if (DBG) Log.v(TAG, "*** LockScreen accel is "
                + (mUnlockWidget.isHardwareAccelerated() ? "on":"off"));
    }
Step 2:在Step 1步骤中根据横竖屏来加载横竖屏的布局:
if (mCreationOrientation != Configuration.ORIENTATION_LANDSCAPE) {
            inflater.inflate(R.layout.keyguard_screen_tab_unlock, this, true);
        } else {
            inflater.inflate(R.layout.keyguard_screen_tab_unlock_land, this, true);
        }
Step 3:来看看竖屏的布局文件的代码:
<GridLayout
    xmlns:android="http://schemas.android.com/apk/res/android"
    android:orientation="vertical"
    android:layout_width="match_parent"
    android:layout_height="match_parent"
    android:gravity="center_horizontal">
    <!-- 锁屏界面加载数字时钟 -->
    <com.android.internal.widget.DigitalClock android:id="@+id/time"
        android:layout_marginTop="@dimen/keyguard_lockscreen_status_line_clockfont_top_margin"
        android:layout_marginBottom="12dip"
        android:layout_marginRight="@dimen/keyguard_lockscreen_status_line_font_right_margin"
        android:layout_gravity="right">

        <!-- Because we can't have multi-tone fonts, we render two TextViews, one on
        top of the other. Hence the redundant layout... -->
        <TextView android:id="@+id/timeDisplayBackground"
            android:layout_width="wrap_content"
            android:layout_height="wrap_content"
            android:singleLine="true"
            android:ellipsize="none"
            android:textSize="@dimen/keyguard_lockscreen_clock_font_size"
            android:textAppearance="?android:attr/textAppearanceMedium"
            android:layout_marginBottom="6dip"
            android:textColor="@color/lockscreen_clock_background"
            />

        <TextView android:id="@+id/timeDisplayForeground"
            android:layout_width="wrap_content"
            android:layout_height="wrap_content"
            android:singleLine="true"
            android:ellipsize="none"
            android:textSize="@dimen/keyguard_lockscreen_clock_font_size"
            android:textAppearance="?android:attr/textAppearanceMedium"
            android:layout_marginBottom="6dip"
            android:textColor="@color/lockscreen_clock_foreground"
            android:layout_alignLeft="@id/timeDisplayBackground"
            android:layout_alignTop="@id/timeDisplayBackground"
            />

    </com.android.internal.widget.DigitalClock>

    <LinearLayout
        android:orientation="horizontal"
        android:layout_gravity="right"
        android:layout_marginRight="@dimen/keyguard_lockscreen_status_line_font_right_margin">
        <!-- 锁屏界面加载日期 -->
        <TextView
            android:id="@+id/date"
            android:layout_width="wrap_content"
            android:layout_height="wrap_content"
            android:singleLine="true"
            android:ellipsize="marquee"
            android:textAppearance="?android:attr/textAppearanceMedium"
            android:textSize="@dimen/keyguard_lockscreen_status_line_font_size"
            />
        <!-- 锁屏界面加载闹钟状态 -->
        <TextView
            android:id="@+id/alarm_status"
            android:layout_width="wrap_content"
            android:layout_height="wrap_content"
            android:layout_marginLeft="16dip"
            android:singleLine="true"
            android:ellipsize="marquee"
            android:textAppearance="?android:attr/textAppearanceMedium"
            android:textSize="@dimen/keyguard_lockscreen_status_line_font_size"
            android:drawablePadding="4dip"
            />

    </LinearLayout>
    <!-- 锁屏界面加载充电状态 -->
    <TextView
        android:id="@+id/status1"
        android:layout_gravity="right"
        android:layout_marginRight="@dimen/keyguard_lockscreen_status_line_font_right_margin"
        android:singleLine="true"
        android:ellipsize="marquee"
        android:textAppearance="?android:attr/textAppearanceMedium"
        android:textSize="@dimen/keyguard_lockscreen_status_line_font_size"
        android:drawablePadding="4dip"
        />

    <Space android:layout_gravity="fill" />
        <RelativeLayout
        android:layout_width="match_parent"
        android:layout_height="302dip">
        <!-- 锁屏界面加载波纹的锁屏 -->
        <com.android.internal.widget.multiwaveview.MultiWaveView
            android:id="@+id/unlock_widget"
            android:orientation="horizontal"
            android:layout_width="match_parent"
            android:layout_height="match_parent"
            android:layout_alignParentBottom="true"

            android:targetDrawables="@array/lockscreen_targets_with_camera"
            android:targetDescriptions="@array/lockscreen_target_descriptions_with_camera"
            android:directionDescriptions="@array/lockscreen_direction_descriptions"
            android:handleDrawable="@drawable/ic_lockscreen_handle"
            android:waveDrawable="@drawable/ic_lockscreen_outerring"
            android:outerRadius="@dimen/multiwaveview_target_placement_radius"
            android:snapMargin="@dimen/multiwaveview_snap_margin"
            android:hitRadius="@dimen/multiwaveview_hit_radius"
            android:rightChevronDrawable="@drawable/ic_lockscreen_chevron_right"
            android:horizontalOffset="0dip"
            android:verticalOffset="60dip"
            android:feedbackCount="3"
            android:vibrationDuration="20"
            />
        <!-- 锁屏界面加载运营商状态 -->
        <TextView
            android:id="@+id/carrier"
            android:layout_width="fill_parent"
            android:layout_height="wrap_content"
            android:layout_alignParentBottom="true"
            android:layout_marginBottom="12dip"
            android:gravity="center_horizontal"
            android:singleLine="true"
            android:ellipsize="marquee"
            android:textAppearance="?android:attr/textAppearanceMedium"
            android:textSize="@dimen/keyguard_lockscreen_status_line_font_size"
            android:textColor="?android:attr/textColorSecondary"
            />

    </RelativeLayout>

    <LinearLayout
        android:orientation="horizontal"
        android:layout_width="match_parent"
        style="?android:attr/buttonBarStyle"
        android:gravity="center"
        android:weightSum="2">
        <!-- 锁屏界面加载紧急拨号按钮 -->
        <Button android:id="@+id/emergencyCallButton"
            android:layout_gravity="center_horizontal"
            android:layout_width="0dip"
            android:layout_height="wrap_content"
            android:layout_weight="1"
            style="?android:attr/buttonBarButtonStyle"
            android:textSize="@dimen/keyguard_lockscreen_status_line_font_size"
            android:text="@*android:string/lockscreen_emergency_call"
            android:drawableLeft="@*android:drawable/lockscreen_emergency_button"
            android:drawablePadding="0dip"
            android:visibility="gone"
        />

    </LinearLayout>

</GridLayout>
Step 4:在Step 3中重点看com.android.internal.widget.multiwaveview.MultiWaveView这个自定义的view,这个view是处理ICS4.0锁屏的拖拽的功能,具体代码如下:
 public MultiWaveView(Context context, AttributeSet attrs) {
        super(context, attrs);
        Resources res = context.getResources();
。。。 。。。
加载资源
。。。 。。。
}
通过onMeasure()来计算自定义view的大小:
 protected void onMeasure(int widthMeasureSpec, int heightMeasureSpec) {
        final int minimumWidth = getSuggestedMinimumWidth();
        final int minimumHeight = getSuggestedMinimumHeight();
        int viewWidth = resolveMeasured(widthMeasureSpec, minimumWidth);
        int viewHeight = resolveMeasured(heightMeasureSpec, minimumHeight);
        setMeasuredDimension(viewWidth, viewHeight);
    }
通过onLayout()来加载布局:
 protected void onLayout(boolean changed, int left, int top, int right, int bottom) {
        super.onLayout(changed, left, top, right, bottom);
        final int width = right - left;
        final int height = bottom - top;
        float newWaveCenterX = mHorizontalOffset + Math.max(width, mOuterRing.getWidth() ) / 2;
        float newWaveCenterY = mVerticalOffset + Math.max(height, mOuterRing.getHeight()) / 2;
        if (newWaveCenterX != mWaveCenterX || newWaveCenterY != mWaveCenterY) {
            if (mWaveCenterX == 0 && mWaveCenterY == 0) {
                performInitialLayout(newWaveCenterX, newWaveCenterY);
            }
            mWaveCenterX = newWaveCenterX;
            mWaveCenterY = newWaveCenterY;

            mOuterRing.setX(mWaveCenterX);
            mOuterRing.setY(Math.max(mWaveCenterY, mWaveCenterY));

            updateTargetPositions();
        }
        if (DEBUG) dump();
    }
Step 5:来看看触摸屏幕时的事件处理onTouchEvent()代码如下:
 @Override
    public boolean onTouchEvent(MotionEvent event) {
        final int action = event.getAction();

        boolean handled = false;
        switch (action) {
            case MotionEvent.ACTION_DOWN:
                handleDown(event);
                handled = true;
                break;

            case MotionEvent.ACTION_MOVE:
                handleMove(event);
                handled = true;
                break;

            case MotionEvent.ACTION_UP:
                handleMove(event);
                handleUp(event);
                handled = true;
                break;

            case MotionEvent.ACTION_CANCEL:
                handleMove(event);
                handled = true;
                break;
        }
        invalidate();
        return handled ? true : super.onTouchEvent(event);
    }
通过handleMove()来处理移动事件:
 private void handleMove(MotionEvent event) {
        if (!mDragging) {
            trySwitchToFirstTouchState(event);
            return;
        }

        int activeTarget = -1;
        final int historySize = event.getHistorySize();
        for (int k = 0; k < historySize + 1; k++) {
            float x = k < historySize ? event.getHistoricalX(k) : event.getX();
            float y = k < historySize ? event.getHistoricalY(k) : event.getY();
            float tx = x - mWaveCenterX;
            float ty = y - mWaveCenterY;
            float touchRadius = (float) Math.sqrt(dist2(tx, ty));
            final float scale = touchRadius > mOuterRadius ? mOuterRadius / touchRadius : 1.0f;
            float limitX = mWaveCenterX + tx * scale;
            float limitY = mWaveCenterY + ty * scale;

            boolean singleTarget = mTargetDrawables.size() == 1;
            if (singleTarget) {
                // Snap to outer ring if there's only one target
                float snapRadius = mOuterRadius - mSnapMargin;
                if (touchRadius > snapRadius) {
                    activeTarget = 0;
                    x = limitX;
                    y = limitY;
                }
            } else {
                // If there's more than one target, snap to the closest one less than hitRadius away.
                float best = Float.MAX_VALUE;
                final float hitRadius2 = mHitRadius * mHitRadius;
                for (int i = 0; i < mTargetDrawables.size(); i++) {
                    // Snap to the first target in range
                    TargetDrawable target = mTargetDrawables.get(i);
                    float dx = limitX - target.getX();
                    float dy = limitY - target.getY();
                    float dist2 = dx*dx + dy*dy;
                    if (target.isValid() && dist2 < hitRadius2 && dist2 < best) {
                        activeTarget = i;
                        best = dist2;
                    }
                }
                x = limitX;
                y = limitY;
            }
            if (activeTarget != -1) {
                switchToState(STATE_SNAP, x,y);
                float newX = singleTarget ? limitX : mTargetDrawables.get(activeTarget).getX();
                float newY = singleTarget ? limitY : mTargetDrawables.get(activeTarget).getY();
                moveHandleTo(newX, newY, false);
                TargetDrawable currentTarget = mTargetDrawables.get(activeTarget);
                if (currentTarget.hasState(TargetDrawable.STATE_FOCUSED)) {
                    currentTarget.setState(TargetDrawable.STATE_FOCUSED);
                    mHandleDrawable.setAlpha(0.0f);
                }
            } else {
                switchToState(STATE_TRACKING, x, y);
                moveHandleTo(x, y, false);
                mHandleDrawable.setAlpha(1.0f);
            }
        }

        // Draw handle outside parent's bounds
        invalidateGlobalRegion(mHandleDrawable);

        if (mActiveTarget != activeTarget && activeTarget != -1) {
            dispatchGrabbedEvent(activeTarget);
            if (AccessibilityManager.getInstance(mContext).isEnabled()) {
                String targetContentDescription = getTargetDescription(activeTarget);
                announceText(targetContentDescription);
            }
        }
        mActiveTarget = activeTarget;
    }
以上主要工作是绘制拖拽的参数以及绘制出来。通过invalidate()来主动刷屏幕;
在onDraw()方法中实现绘制图形,代码如下:
    @Override
    protected void onDraw(Canvas canvas) {
        mOuterRing.draw(canvas);
        for (TargetDrawable target : mTargetDrawables) {
            if (target != null) {
                target.draw(canvas);
            }
        }
        for (TargetDrawable target : mChevronDrawables) {
            if (target != null) {
                target.draw(canvas);
            }
        }
        mHandleDrawable.draw(canvas);
    }
在handleMove()方法中——>trySwitchToFirstTouchState(event);——>switchToState()——>doFinish();
——>setGrabbedState() ————>mOnTriggerListener.onGrabbedStateChange(this, mGrabbedState);
设置回调。
Step 6:LockScreen.java中有个内部类,监听这个移动事件的状态,——> 代码如下:
 class MultiWaveViewMethods implements MultiWaveView.OnTriggerListener,
            UnlockWidgetCommonMethods {

        private final MultiWaveView mMultiWaveView;
        private boolean mCameraDisabled;

        MultiWaveViewMethods(MultiWaveView multiWaveView) {
            mMultiWaveView = multiWaveView;
            final boolean cameraDisabled = mLockPatternUtils.getDevicePolicyManager()
                    .getCameraDisabled(null);
            if (cameraDisabled) {
                Log.v(TAG, "Camera disabled by Device Policy");
                mCameraDisabled = true;
            } else {
                // Camera is enabled if resource is initially defined for MultiWaveView
                // in the lockscreen layout file
                mCameraDisabled = mMultiWaveView.getTargetResourceId()
                        != R.array.lockscreen_targets_with_camera;
            }
        }

        public void updateResources() {
            int resId;
            if (mCameraDisabled) {
                // Fall back to showing ring/silence if camera is disabled by DPM...
                resId = mSilentMode ? R.array.lockscreen_targets_when_silent
                    : R.array.lockscreen_targets_when_soundon;
            } else {
                resId = R.array.lockscreen_targets_with_camera;
            }
            mMultiWaveView.setTargetResources(resId);
        }

        public void onGrabbed(View v, int handle) {

        }

        public void onReleased(View v, int handle) {

        }

        public void onTrigger(View v, int target) {
            if (target == 0 || target == 1) { // 0 = unlock/portrait, 1 = unlock/landscape
                mCallback.goToUnlockScreen();
            } else if (target == 2 || target == 3) { // 2 = alt/portrait, 3 = alt/landscape
                if (!mCameraDisabled) {
                    // Start the Camera
                    Intent intent = new Intent(MediaStore.INTENT_ACTION_STILL_IMAGE_CAMERA);
                    intent.setFlags(Intent.FLAG_ACTIVITY_NEW_TASK);
                    mContext.startActivity(intent);
                    mCallback.goToUnlockScreen();
                } else {
                    toggleRingMode();
                    mUnlockWidgetMethods.updateResources();
                    mCallback.pokeWakelock();
                }
            }
        }

        public void onGrabbedStateChange(View v, int handle) {
            // Don't poke the wake lock when returning to a state where the handle is
            // not grabbed since that can happen when the system (instead of the user)
            // cancels the grab.
            if (handle != MultiWaveView.OnTriggerListener.NO_HANDLE) {
                mCallback.pokeWakelock();
            }
        }

        public View getView() {
            return mMultiWaveView;
        }

        public void reset(boolean animate) {
            mMultiWaveView.reset(animate);
        }

        public void ping() {
            mMultiWaveView.ping();
        }
    }
重点看public void onTrigger()这个方法,用于处理拖拽启动那个activity,一个启动camera,一个正常解锁。
锁屏的大概这个流程就是这个样子了,大家应该会一目了然了。由于时间仓促,难免有点纰漏,希望大家指正错误,如有不解的地方,欢迎留言探讨!!!


发表评论

相关推荐
一>、Android重启功能 在androidjava层执行shell命令来完成。但是笔者在开发测试中同样的代码发现用Eng编译出的版本可以重新启动,user版本不能完成重启,挂在关机那个界面。 /********************************...
详情请查看资源内容中使用说明;详情请查看资源内容中使用说明;详情请查看资源内容中使用说明;详情请查看资源内容中使用说明;详情请查看资源内容中使用说明;详情请查看资源内容中使用说明;详情请查看资源内容中使用说明;详情请查看资源内容中使用说明;详情请查看资源内容中使用说明;详情请查看资源内容中使用说明;详情请查看资源内容中使用说明;详情请查看资源内容中使用说明;详情请查看资源内容中使用说明;详情请查看资源内容中使用说明;详情请查看资源内容中使用说明;详情请查看资源内容中使用说明;详情请查看资源内容中使用说明;详情请查看资源内容中使用说明;详情请查看资源内容中使用说明;详情请查看资源内容中使用说明;详情请查看资源内容中使用说明;详情请查看资源内容中使用说明;详情请查看资源内容中使用说明;详情请查看资源内容中使用说明;详情请查看资源内容中使用说明;详情请查看资源内容中使用说明;
YOLO高分设计资源源码,详情请查看资源内容中使用说明 YOLO高分设计资源源码,详情请查看资源内容中使用说明 YOLO高分设计资源源码,详情请查看资源内容中使用说明 YOLO高分设计资源源码,详情请查看资源内容中使用说明YOLO高分设计资源源码,详情请查看资源内容中使用说明YOLO高分设计资源源码,详情请查看资源内容中使用说明YOLO高分设计资源源码,详情请查看资源内容中使用说明YOLO高分设计资源源码,详情请查看资源内容中使用说明YOLO高分设计资源源码,详情请查看资源内容中使用说明YOLO高分设计资源源码,详情请查看资源内容中使用说明YOLO高分设计资源源码,详情请查看资源内容中使用说明YOLO高分设计资源源码,详情请查看资源内容中使用说明YOLO高分设计资源源码,详情请查看资源内容中使用说明YOLO高分设计资源源码,详情请查看资源内容中使用说明YOLO高分设计资源源码,详情请查看资源内容中使用说明YOLO高分设计资源源码,详情请查看资源内容中使用说明YOLO高分设计资源源码,详情请查看资源内容中使用说明YOLO高分设计资源源码,详情请查看资源内容中使用说明YOLO高分设计资源源码,详情请查看资源内容中使用说明YOLO高分设计资源源码,详情请查看资源内容中使用说明YOLO高分设计资源源码,详情请查看资源内容中使用说明YOLO高分设计资源源码,详情请查看资源内容中使用说明YOLO高分设计资源源码,详情请查看资源内容中使用说明YOLO高分设计资源源码,详情请查看资源内容中使用说明YOLO高分设计资源源码,详情请查看资源内容中使用说明YOLO高分设计资源源码,详情请查看资源内容中使用说明
PPT模板,答辩PPT模板,毕业答辩,学术汇报,母校模板,我给母校送模板作品,周会汇报,开题答辩,教育主题模板下载。PPT素材下载。
Node.js,简称Node,是一个开源且跨平台的JavaScript运行时环境,它允许在浏览器外运行JavaScript代码。Node.js于2009年由Ryan Dahl创立,旨在创建高性能的Web服务器和网络应用程序。它基于Google Chrome的V8 JavaScript引擎,可以在Windows、Linux、Unix、Mac OS X等操作系统上运行。 Node.js的特点之一是事件驱动和非阻塞I/O模型,这使得它非常适合处理大量并发连接,从而在构建实时应用程序如在线游戏、聊天应用以及实时通讯服务时表现卓越。此外,Node.js使用了模块化的架构,通过npm(Node package manager,Node包管理器),社区成员可以共享和复用代码,极大地促进了Node.js生态系统的发展和扩张。 Node.js不仅用于服务器端开发。随着技术的发展,它也被用于构建工具链、开发桌面应用程序、物联网设备等。Node.js能够处理文件系统、操作数据库、处理网络请求等,因此,开发者可以用JavaScript编写全栈应用程序,这一点大大提高了开发效率和便捷性。 在实践中,许多大型企业和组织已经采用Node.js作为其Web应用程序的开发平台,如Netflix、PayPal和Walmart等。它们利用Node.js提高了应用性能,简化了开发流程,并且能更快地响应市场需求。
2024-2030全球与中国混合光纤同轴网络市场现状及未来发展趋势
PPT模板,答辩PPT模板,毕业答辩,学术汇报,母校模板,我给母校送模板作品,周会汇报,开题答辩,教育主题模板下载。PPT素材下载。
商品关联关系挖掘,使用Spring Boot开发框架和Spark MLlib机器学习框架,通过FP-Growth算法,分析用户的购物车商品数据,挖掘商品之间的关联关系。项目对外提供RESTFul接口。.zip
OpenCv 使用fffffffff
Node.js,简称Node,是一个开源且跨平台的JavaScript运行时环境,它允许在浏览器外运行JavaScript代码。Node.js于2009年由Ryan Dahl创立,旨在创建高性能的Web服务器和网络应用程序。它基于Google Chrome的V8 JavaScript引擎,可以在Windows、Linux、Unix、Mac OS X等操作系统上运行。 Node.js的特点之一是事件驱动和非阻塞I/O模型,这使得它非常适合处理大量并发连接,从而在构建实时应用程序如在线游戏、聊天应用以及实时通讯服务时表现卓越。此外,Node.js使用了模块化的架构,通过npm(Node package manager,Node包管理器),社区成员可以共享和复用代码,极大地促进了Node.js生态系统的发展和扩张。 Node.js不仅用于服务器端开发。随着技术的发展,它也被用于构建工具链、开发桌面应用程序、物联网设备等。Node.js能够处理文件系统、操作数据库、处理网络请求等,因此,开发者可以用JavaScript编写全栈应用程序,这一点大大提高了开发效率和便捷性。 在实践中,许多大型企业和组织已经采用Node.js作为其Web应用程序的开发平台,如Netflix、PayPal和Walmart等。它们利用Node.js提高了应用性能,简化了开发流程,并且能更快地响应市场需求。
【资源说明】【毕业设计】 1、该资源内项目代码都是经过测试运行成功,功能正常的情况下才上传的,请放心下载使用。 2、适用人群:主要针对计算机相关专业(如计科、信息安全、数据科学与大数据技术、人工智能、通信、物联网、数学、电子信息等)的同学或企业员工下载使用,具有较高的学习借鉴价值。 3、不仅适合小白学习实战练习,也可作为大作业、课程设计、毕设项目、初期项目立项演示等,欢迎下载,互相学习,共同进步!
基于java的学校教务管理系统 (jsp+servlet+sqlserver)(含程序运行详细说明文档).zip
根据App Store的审核条款总结出的checklist
YOLO高分设计资源源码,详情请查看资源内容中使用说明 YOLO高分设计资源源码,详情请查看资源内容中使用说明 YOLO高分设计资源源码,详情请查看资源内容中使用说明 YOLO高分设计资源源码,详情请查看资源内容中使用说明YOLO高分设计资源源码,详情请查看资源内容中使用说明YOLO高分设计资源源码,详情请查看资源内容中使用说明YOLO高分设计资源源码,详情请查看资源内容中使用说明YOLO高分设计资源源码,详情请查看资源内容中使用说明YOLO高分设计资源源码,详情请查看资源内容中使用说明YOLO高分设计资源源码,详情请查看资源内容中使用说明YOLO高分设计资源源码,详情请查看资源内容中使用说明YOLO高分设计资源源码,详情请查看资源内容中使用说明YOLO高分设计资源源码,详情请查看资源内容中使用说明YOLO高分设计资源源码,详情请查看资源内容中使用说明YOLO高分设计资源源码,详情请查看资源内容中使用说明YOLO高分设计资源源码,详情请查看资源内容中使用说明YOLO高分设计资源源码,详情请查看资源内容中使用说明YOLO高分设计资源源码,详情请查看资源内容中使用说明YOLO高分设计资源源码,详情请查看资源内容中使用说明YOLO高分设计资源源码,详情请查看资源内容中使用说明YOLO高分设计资源源码,详情请查看资源内容中使用说明YOLO高分设计资源源码,详情请查看资源内容中使用说明YOLO高分设计资源源码,详情请查看资源内容中使用说明YOLO高分设计资源源码,详情请查看资源内容中使用说明YOLO高分设计资源源码,详情请查看资源内容中使用说明YOLO高分设计资源源码,详情请查看资源内容中使用说明
对于本视频点播系统的设计来说,系统开发主要是采用java语言技术,在整个系统的设计中应用MySQL数据库来完成数据存储,具体根据视频点播系统的现状来进行开发的,具体根据现实的需求来实现视频点播系统网络化的管理,各类信息有序地进行存储,进入视频点播系统页面之后,方可开始操作主控界面,主要功能包括管理员:首页、个人中心、学生管理、教师管理、视频分类管理、视频信息管理、系统管理,学生前台:首页、视频信息、系统公告、个人中心、后台管理,教师:首页、个人中心、视频信息管理等功能。 本文主要讲述了视频点播系统开发背景,该系统它主要是对需求分析和功能需求做了介绍,并且对系统做了详细的测试和总结。具体从业务流程、数据库设计和系统结构等多方面的问题。望能利用先进的计算机技术和网络技术来改变目前的视频点播系统状况,提高管理效率。 关键词:视频点播系统;SSM框架,mysql数据库,B/S模式
ky10升级内核版本包
高分设计源码,详情请查看资源内容中使用说明 高分设计源码,详情请查看资源内容中使用说明高分设计源码,详情请查看资源内容中使用说明高分设计源码,详情请查看资源内容中使用说明高分设计源码,详情请查看资源内容中使用说明高分设计源码,详情请查看资源内容中使用说明高分设计源码,详情请查看资源内容中使用说明高分设计源码,详情请查看资源内容中使用说明高分设计源码,详情请查看资源内容中使用说明高分设计源码,详情请查看资源内容中使用说明高分设计源码,详情请查看资源内容中使用说明高分设计源码,详情请查看资源内容中使用说明高分设计源码,详情请查看资源内容中使用说明高分设计源码,详情请查看资源内容中使用说明高分设计源码,详情请查看资源内容中使用说明高分设计源码,详情请查看资源内容中使用说明高分设计源码,详情请查看资源内容中使用说明高分设计源码,详情请查看资源内容中使用说明高分设计源码,详情请查看资源内容中使用说明高分设计源码,详情请查看资源内容中使用说明高分设计源码,详情请查看资源内容中使用说明高分设计源码,详情请查看资源内容中使用说明
针对小质量器件的称重和计数包装特点,本文设计了 个基千单片机的可以实现 高精度称重和智能计数的智能仪表。仪表主要由电源、 称重传感器、 单片机、 键盘/开关、LCD显示器等部分构成。仪表输入采用电阻应变式称重传感器, 模数转换利用 具有24位精度的AID转换器把传感器的模拟信号转换为数字信号送给单片机处理。通过软件的设计可以完成高精度的称重和针对小质量器件的准确计数。仪表还设计了按键、液晶显示器及翁鸣器等输入输出器件实现了良好的人机交互功能, 能够完成对 称重和计数的标定以及相关参数的设置。另外仪表还预留了通讯接口, 为以后的升级 以及联网数据传送奠定了基础。
基于Python的PCA人脸识别算法的原理及实现代码详解(优质项目).zip个人经导师指导并认可通过的98分课程设计项目,主要针对计算机相关专业的正在做课程设计、期末大作业的学生和需要项目实战练习的学习者。 基于Python的PCA人脸识别算法的原理及实现代码详解(优质项目).zip个人经导师指导并认可通过的98分课程设计项目,主要针对计算机相关专业的正在做课程设计、期末大作业的学生和需要项目实战练习的学习者。 基于Python的PCA人脸识别算法的原理及实现代码详解(优质项目).zip个人经导师指导并认可通过的98分课程设计项目,主要针对计算机相关专业的正在做课程设计、期末大作业的学生和需要项目实战练习的学习者。 基于Python的PCA人脸识别算法的原理及实现代码详解(优质项目).zip个人经导师指导并认可通过的98分课程设计项目,主要针对计算机相关专业的正在做课程设计、期末大作业的学生和需要项目实战练习的学习者。 基于Python的PCA人脸识别算法的原理及实现代码详解(优质项目).zip个人经导师指导并认可通过的98分课程设计项目,主要针对计算机相关专业的正在做课程设
python180数学函数绘图软件cs.zip